Showing posts with label Gateway Garlic Urban Farm. Show all posts

Monday, January 12, 2015

Sunchokes , A sustainable crop that benefits humans and pollinators.

PrincipleNutrient ValuePercentage of RDA
Energy73 Kcal3.7%
Carbohydrates17.44 g13%
Protein2 g4%
Total Fat0.01 g<1%
Cholesterol0 mg0%
Dietary Fiber1.6 g4%
Vitamins
Folates13 µg3%
Niacin1.3 mg8%
Pantothenic acid0.397 mg8%
Pyridoxine0.077 mg6%
Riboflavin0.060 mg4.5%
Thiamin0.200 mg17%
Vitamin A20 IU<1%
Vitamin C4 mg7%
Vitamin E0.19 mg1%
Vitamin K0.1 µg<1%
Electrolytes
Sodium4 mg<1%
Potassium429 mg9%
Minerals
Calcium14 mg1.4%
Copper0.140 mg15%
Iron3.40 mg42.5%
Magnesium17 mg4%
Manganese0.060 mg2%
Selenium0.7 µg1%
Zinc0.12 mg1%
Phyto-nutrients
Carotene-β12 µg--
Carotene-α0 µg--
Lutein-zeaxanthin0 µg--


The Jerusalem artichoke (Helianthus tuberosus), also called sunroot,sunchoke, earth apple ortopinambour, is a species of sunflower native to eastern North America, and found from eastern Canada and Maine west to North Dakota, and south to northern Florida and Texas It is also cultivated widely across the temperate zone for its tuber, which is used as a root vegetable growing to 1.5–3 m (4 ft 11 in–9 ft 10 in) tall with opposite leaves on the upper part of the stem but alternate below.The leaves have a rough, hairy texture and the larger leaves on the lower stem are broad ovoid-acute and can be up to 30 cm (12 in) long, and the higher leaves smaller and narrower.

The flowers are yellow and produced in capitate flower heads, which are 5–10 cm (2.0–3.9 in) in diameter, with 10–20 ray florets.

The tubers  are elongated and uneven, typically 7.5–10 cm (3.0–3.9 in) long and 3–5 cm (1.2–2.0 in) thick, and vaguely resembling ginger root  in appearance, with a crisp texture when raw. They vary in colour from pale brown to white, red, or purple.

The artichoke contains about 10% protein, no oil, and a surprising lack of starch. However, it is rich in the carbohydrate inulin  (76%), which is a polymer of the monosaccharide fructose. Tubers stored for any length of time will convert their inulin into its component fructose. Jerusalem artichokes have an underlying sweet taste because of the fructose, which is about one and a half times sweeter than sucrose.

Sunchokes have also been promoted as a healthy choice for type 2 diabetics, because fructose is better tolerated by people who are type 2 diabetic. It has also been reported as a folk remedy for diabetes.[Temperature variances have been shown to affect the amount of inulin the Jerusalem artichoke can produce. When not in tropical regions, it has been shown to make less inulin than when it is in a warmer region.

Strains vary by skin color, root shape, and maturation time. White-skinned strains include the early-maturing ‘Stampede’ variety, which develops crisp, round roots quickly enough to be grown in climates with short summers. The roots of slower-growing ‘Clearwater’ and ‘White Fuseau’ are longer, which makes them easier to scrub and peel.

Red-skinned strains include ‘Red Fuseau,’ which has red skin over topshaped roots with few attached round nodules, making the roots easy to clean. The roots of ‘Red Rover,’ ‘Waldspinel,’ and a few other red varieties are so long that these varieties are sometimes called “fingerling sunchokes.”


Sunchokes do very well under light insect feeding from Japanese beetles and the like. There is no need to worry about the insect damage to the plant, they take it like a champ, and therefore require no pest management. 
The plant will put sometimes over 100 flowers which are loved by bees and butterflies. These flowers usually come out after your regular sunflowers have already died off making it an excellent crop for extending feeding sources for pollinators . Stepping on some of the canes while they are growing or "lodging "often helps to produce more tubers. 

Planting should be early in the spring, when the soil can be satisfactorily worked. Later planting results in reduced yields. Whole tubers or pieces of tubers that are no less than two ounces and have two or three prominent buds should be planted. Smaller seed pieces will reduce yields but larger seed pieces (over 2 oz) will not significantly increase them. Do not allow cut seed pieces to dry before planting. Plant 3 to 5 inches deep, in rows 36 to 42 inches wide with 15 to 24 inches between plants.

Cultivate shallowly and only as needed to control grass and weeds as the planting is being established. During plant establishment, grass and weed problems will be reduced by shading since plants grow over 6 ft high. Tubers begin to form in August and may become 4 inches long and 2 to 3 inches in diameter.


The crop should not be harvested until after frost. Tubers dug later in the season are sweeter but have less inulin. Tops should be cut with a mower. Plow open the furrow, pick up the tubers, place in field containers, and remove from the field. Hand rakes can be used to great advantage in locating the tubers. Because of their small size it is necessary to use a small, modified potato harvester to mechanically harvest the tubers.


The skin of the chokes is very thin. Care should be taken in handling to avoid skinning, cuts and bruises. The skin is also susceptible to rapid moisture loss so the crop should be put in storage immediately after harvest. Cold storage facilities should have high humidity (85 to 95% relative humidity) and a temperature near 32 0F. Under these conditions, tubers can be kept for several months. If the tubers are to be washed, fresh water sanitized with bleach should be used.

I usually store them in Ziploc plastic bags with a moistened paper towel on top of them. 


There is considerable variation in yields but generally growers may expect from 5 to 7 tons per acre.


Please keep in mind that all you have to do is plant them once because they are a wee bit invasive. You will never be able to get every tuber and every rhizome out and the plant will reseed itself. You of course can control this by burying edge treatments to keep them contained into a certain area or plant them in very large potted containers. The pollinators love these flowers and are all over them and once you get used to tasting sunchokes you will too. Some of the restaurants we sell them to primarily make Jerusalem artichoke soup or do a 50-50 mash mixing them with potatoes. I personally like them as a replacement for water chestnuts in my stirfries and baked Jerusalem artichoke chips are now the rave.

Saturday, September 20, 2014

saving cucumber seeds the easy way

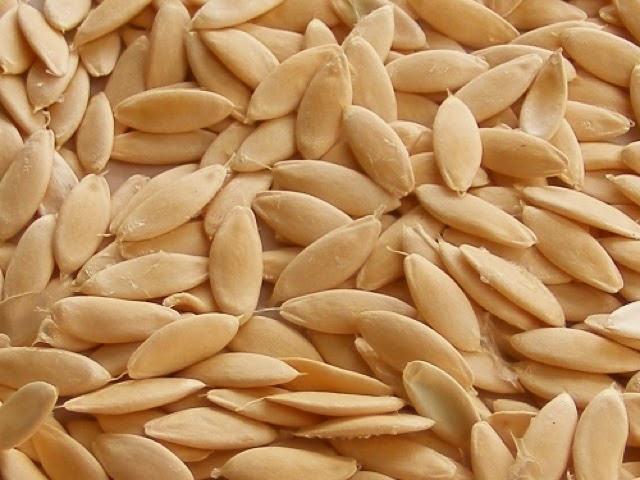
Saving cucumber seeds is fun and easy and you'll find many different ways to save them online. Some people ferment the cucumber seeds like tomato seeds and most of the processes you'll find out their use this method,where you ferment the cucumber seeds for up to five days. Fermenting cucumber seeds does not aid its germination like tomato seeds and the reason people ferment them is to make things easier to clean. This is one process to skip the fermentation process altogether.
First, allow your cucumbers to fully ripen indoors. By ripening ithey should get soft and you should store them in a cool dark place till this happens. When your cucumbers are fully ripe and cut them in half and scoop out the inside. 
Depending on the variety of cucumber that you're growing the seeds may or may not separate easily from the large white opaque-ish material that holds them together in the seat array. Using your fingers you should easily be able to squeeze out most of the seeds and remove almost all of the white opaque-ish material until you have something that looks like this
Note that it is very gelatinous and the seeds also are surrounded with a gelatinous type of coating. This is where some people will ferment their seeds and of course this is how we teach you to skip that process. First of all,add some water to this material and separate out any remaining bits of large pulp. Then depending on the size of your sieve, fill it with one third volume of seeds and gelatin and place it in your sink.
Using the nozzle from your kitchen sink spray directly into the seat and gelatin mixture. You will find that the water action in conjunction with the sieve itself will begin to break up and separate the seeds from the remaining bit of gelatin.
Do not overflow yourself and allow it to drain before repeating the process with the remainder of your seeds. Place this in another bowl while you finish repeating this process. After you have finished all your seeds you should now add some water to the bowl
That funny looking haze you see in this picture is the seedcoats that have begun to separate from the seed itself. Something else you'll notice is that the good seeds have already begun to sink to the bottom and the immature undeveloped seeds have begun to float to the top. Allow this mixture a couple of minutes to settle and then pour off some of this water/gelatin seedcoat/immature seed taking care to leave the good seeds behind. As you pour off, you'll be able to see the ghost like seedcoats that have separated from the seeds themselves, and can easily be removed by this pouring off process.
Repeat this process three or four more times and you will find that each time its repeated the water gets clearer and clearer. Finally drain all your seeds in the sieve and allow it to drain for a few minutes. 
I then place a towel on a plastic tray or in this case a lid to a plastic tote and on top of that I put a couple layers of paper towels. On top of the paper towels I have put the seeds to drain even more water off them and I am helping to encourage it by the aid of a small fan.
I picked this little fan up from a garage sale and it also has a heater option to it as well. This can work with some seed saving if you put the heat option on to encourage drying. Make sure if you are using a heat option to keep it at a distance from the seeds to prevent any accidental cooking. In this case I'm using no heat. I am only allowing this to run for 30 minutes to remove excess moisture from the seeds . I will remove the seeds from the paper towel and put them on the final drying receptacle. In this case it is in old tray to an old defunct microwave that I no longer own.
I could not bear to think about throwing out this beautiful glass tray just because the microwave did not work anymore. I often utilize this glass tray in seed saving. With some seeds that are processed wet it's best to do your final drying on either glass, parchment paper, or those silicone and plastic cutting board. Sometimes a window screen from a triple track storm window works well too.The final drying of seeds on towels or paper towels sometimes causes a nightmare with the seeds wanting to stick to themselves and the paper itself making separation hard. So I will only use the paper towel method to blot off moisture and utilize a glass tray for the final drying process. For the first few hours in final drying you should go through the seeds with your fingers helping to spread them around to ensure even drying. Usually within 24 hours you'll notice that the seeds have lost a lot of their exterior moisture and are now resembling the dried seed you buy in a pack.
At this time you can turn the fan off and let your seeds finish air drying or you can speed the process up by keeping the fan on for the next day or two. Do not immediately pack the seeds in any kind of plastic receptacle. Just because they feel dry doesn't mean that they are dry and often the seeds will turn and encourage mold to develop if left in a environment like a Tupperware container or a plastic baggie. I will let my seeds dry for a full week before I pack them into paper envelopes.
Like these fine envelopes I got from office supply solutions http://www.officesupplysolutionsllc.com
They are fantastic and work well for our seed swaps and are freaking cheap too .

Grow seed 
Save seed 
Share seed
Save seed
Repeat  

Sunday, April 27, 2014

The squash vine borer and it's management

The squash vine borer, Melitta curcurbitae, is a common clearwing moth in home gardens in Midwest. It is a serious pest of vine crops, commonly attacking summer squash, winter squash, and pumpkins. Cucumbers and melons are less frequently affected. In home gardens, entire crops may be lost in a year of high borer populations.

    The adult Squash vine Borer Moth 

The adult borer resembles a wasp. It is about 1/2 inch long with an orange abdomen with black dots.The first pair of wings is metallic green while the back pair of wings is clear, although that may be hard to see as the wings are folded behind them when they at rest. Eggs are flat, brown, and about 1/25 inch long. The larvae are white or cream-colored with brown heads, growing to almost an inch in length.

Larvae inside a stem 

Beginning in late may or early June ( might arrive earlier or later depending on how far north or south you are , Times are given here for the St. Louis region) , squash vine borer adults emerge from cocoons in the ground. Squash vine borer adults are good fliers for moths and resemble wasps in flight. These moths are unusual because they fly during the day while nearly all other moths fly at night.

Soon after emerging, squash vine borers lay eggs singly at the base of susceptible plants. Approximately one week after they are laid, the eggs hatch and the resulting larvae bore into stems to feed. The larvae feed through the center of the stems, blocking the flow of water to the rest of the plant. The larvae feed for four to six weeks, then exit the stems and burrow about one to two inches into the soil to pupate. They remain there until the following summer. There is one generation per year.

SVB eggs on stem

Damage and tell tale signs of infestation 

Often the first symptom of a borer attack is wilting of affected plants.  Wilting may occur only in strong sun at first , but if the problem is left unchecked, the plants eventually collapse and die. Closer observation of a wilting plant often reveals holes near the base of the plant filled with moist greenish or orange sawdust-like material called frass . Over time, the base may become mushy or rot away altogether. Several borer larvae may attack a single plant.

Management

Squash vine borers are challenging to prevent or manage. Use integrated pest management (IPM) methods for the best results. Most management options are limited to control the hatching larvae before they enter the plant. Once the larvae invade the stem, it is difficult to treat squash vine borers. Home gardeners can take a proactive stance against squash vine borers by monitoring your squash for the presence of adult borers starting the last week of May . Monitoring tells you if and when squash vine borers are present. This information helps you determine what further management measures may be necessary. There are two methods for detecting squash vine borer adults. The first is actual observation of adult activity in the garden. These moths are conspicuous insects when flying and easy to detect; watch for them when you're in your garden. In addition, the adults make a very noticeable buzzing sound when flying that is easy to detect while in the garden.

You can also use yellow trap pans to detect squash vine borer adults. This can be any container (e.g. pan, pail, bowl) colored yellow and filled with water. Because squash vine borer adults are attracted to yellow, they will fly to the container and be trapped when they fall into the water. Place traps by late June, checking your traps at least once a day. When you notice squash vine borer adults in your traps you know they are active and it is time to take further action.

Cultural

  • Plant vine crops that are usually not attacked by squash vine borers, such as butternut squash, cucumbers, melons, and watermelons.
  • A second planting of summer squash made in early June will mature after adult borers have finished laying eggs.
  • Promptly pull and destroy any plants killed by squash vine borers.

Physical

You can physically exclude adult borers by placing floating row covers over your vine crops when they start to vine (or for non-vining varieties, starting late May or early June ) or when you first detect squash vine borer adults. Keep the barriers in place for about two weeks after the first adult borer has been seen. Be sure the row covers are securely anchored to prevent adults from moving underneath it.

Generally do not use floating row covers anytime crops are flowering. This prevents bees from pollinating your vegetables which will have a negative impact on plants. An exception to this would be if you pollinate your crops by hand while the floating row cover is erected.


Another alternative would be to release the parasitic wasps called Trichogranma which lay their eggs inside the pest eggs, stopping development. The larvae feed on the egg and then emerge as adults. Tjhey ( the larvae ) take 10 days to develop within the pest moth egg, which turns brown or black as the larvae pupate. They chew a small hole in the moth egg to emerge. Adult wasps feed on nectar, honeydew and pollen. The adult wasps live anywhere from 7 to 14 days, depending on temperature and moisture. The females will parasitize up to 300 pest moth eggs, laying one or more eggs inside each moth egg.They will work as a beneficial insect for control of the following: Armyworm (Pseudaletia unipuncta), Beet Armyworm (Spodoptera exigua (Hubner)), Black Cutworm (Agrotis ipsilon (Hufnagel)), Bollworm (Helicoverpa zea), Broccoli Worms; Imported Cabbage Worm (Pieris rapae), Cabbage Butterfly (Pieris rapae), Cabbage Looper (Trichoplusia ni), Cabbage Moth, Cabbage Army Moth (Mamestra brassicae), Cabbage Worm (Pieris rapae), Caterpillar Eggs (Mult), Celery Worm (aka Parsley Worm, Parsnip Butterfly, Eastern Black Swallowtail, American Swallowtail) (Papilio polyxenes), Cherry Fruit Worm (Grapholita pacakardi), Codling Moth (Cydia pomonella), Corn Borer (aka European Corn Borer) (Ostrinia nubilalis), Corn Borer (aka Southwestern Corn Borer) (Diatraea grandiosella), Corn Earworm (Helicoverpa zea), Cutworm (Agrotis, Amathes, Peridroma, Prodenia spp), Diamondback Moth (Plutella xylostella), European Corn Borer (aka Corn Borer) (Ostrinia nubilalis), Fall Armyworm (Spodoptera frugiperda), Fall Canker Worms, Inchworms (Alsophila pometaria), Fall Webworm (hyphantria cunea), Grape Leaf Folder (Desmia funeralis), Grape Leafroller (Erythroneura variabilis), Greater Peach Tree Borer (Synanthedon exitiosa), Gypsy moth (Lymantria dispar), Hickory Shuckworm (Cydia caryana), Hornworm (Manduca sp), Inch worm (Mult), Iris Borer (Macronoctua onusta), Leafminer (Phyllocnistis sp), Leafroller (Archips argyrospila), Leafroller (Platynota stultana), Leafroller (Choristoneura rosaceana), Leafroller (Pandemis pyrusana), Leafroller (Argyrotaenia franciscana), Leafroller (Epiphyas postvittana), Lesser Peach Tree Borer (Synanthedon pictipes), Omnivorous leafroller (Platynota stultana), Orange tortrix (Argyrotaenia (=citrana) franciscana), Orangeworm (Amyelois transitella), Oriental Fruit Moth (Grapholitha molesta), Parsleyworm (Papilio polyxenes asterius), Peach Twig Borer (Anarsia lineatella Zeller), Pecan Casebearer (Acrobasis nuxvorella Neunzig), Pink Bollworm (Pectinophora gossypiella), Plume Moth (Platyptilia sp), Red-banded Leafroller (Argyrotaenia velutinana), Sod Webworm (Mult), Sperry's Lawn Moth (Crambus sperryellus), Spring Canker Worms, Inchworms (Paleacrita vernata), Squash Vine Borer (Melitta curcurbitae), Tent Caterpillar (Malacosoma americanum), Tobacco budworm (Heliothis virescens), Tomato Fruitworm (Helicoverpa (Heliothis) zea), Tomato Hornworm (Manduca quinquemaculata), Tomato Pinworm (Keiferia lycopersicella), True Armyworm (Pseudaletia unipuncta), Walnut Caterpillar (Datana integerrima), Webworm (Hyphantria cunea), Western Lawn Moth (Tehama bonifatella)

If, despite your efforts, your crop is successfully attacked by borers, you can try to kill the borer inside the vine. Although the chance of saving the plant is not good, you do not have much to lose. As soon as wilting is noticed, use a sharp knife to cut a slit in the affected stem. Slice carefully up the vine until you locate the borer (or borers). Once you have killed any borers with the tip of the knife, mound moist soil over the cut area and keep this spot well watered. New roots may grow along the cut stem, allowing the plant to survive. Watering it with Willow water will help to encourage more root growth. 


Monday, December 2, 2013

Homemade garlic skin paper

This paper is a 0 km paper meeting all the materials to make it came from right around my homestead. It is made from recycled newspaper, pulverized garlic skins and chunk garlic skin. The newspapers were heated in the pot on the stove and then pulverized in a food processor. A large portion of garlic skin was pulverized and then next with the recycled newspaper matter. I next added in broken chunks of unpulverized garlic skin for color and texture. I added a few tablespoons of starch for sizing 
I took a window screen out of my house and I placed it on a flat sidewalk. There was a little raised lip of the metal frame which supported the screen which I placed up right. I made sure my mixture was fluid enough to pour well and I poured it out on the window screen. I allowed this to drain away for several hours , leaving an evenly deposited pulp mixture across the entire screen surface. I then took a piece of plexiglass that I had and placed it on top of the poured mixture and I pressed to squeeze out the water. I allowed this to drain for several hours and then I flipped the entire mechanism upside down placing the plexiglass on the bottom and the screen on top. The screen easily lifted off the new top surface of the paper and I was able to rinse it and return it back to its home undamaged. I use a portable fan to blow dry it until I could lift it off the plexiglass and it is still drying as of posting this . 

Thursday, October 17, 2013

Growing veggies from kitchen scraps


There are many kitchen cut vegetables that can be regrown to provide food for your household. Some of these are often thought as waste and  kicked into the garbage and most of you I hope will be instead kicked these into your compost pit or to feeding them to some of your backyard animals. If you have the space there's no need to let these things go to waste. Often I will replant these cut vegetable bottoms in potted containers and once they get going I'll give them to friends as gifts. Vegetables like green onions, bok choy, celery, lettuce, and pineapple can be regrown to provide another course of fresh homegrown goodies. 
Pineapple is a unique regrown fruit and is pretty simple to do. Usually when you prepare your pineapple you cut off the top and the bottom. When regrowing this for just place the top on top of the bottom and simply played in the dirt. It's that easy and let the play do it on its own. If you are not in a year-round warm climate then plant this in a potted container that you can bring indoors. It takes two years to regrow pineapple this way. 
Green onions are fantastic to regrow and when prepared in the kitchen most people cut off the white bulb bottom including the roots. These can be simply replanted back in the dirt and we usually space them about 3 inches apart in rows of 6 inches or more. If you harvested green onions in the field with scissors rather than pulling up the bulb there's no replanting to be done there. Just cut as needed and you'll always have a supply. 
Bok choy ,celery and lettuces we will sometimes start indoors and allow them to root first before planting them outside. One just simply gives a fresh cut on the bottom of the vegetable taking off a 16th of an inch of material. Often the root end of the vegetables you buy at the store, will be healed over and this fresh-cut gives the roots a chance to grow faster. We have also planted these vegetables directly into the soil outside and if it is spring or fall time we have not seen any problem with them rooting directly right in the dirt. Watering well to make sure they don't dry out. Pre rooting you veggies indoors in the summertime helps to prevent the hot summers from drying them out. We always follow the planting guide ( spacing , depth etc. . ) when replanting cut vegetables and we treat the replanted cut vegetables as one would treat seedlings or starter plants going in the ground. Often restaurants will discard large amounts of these and you can take advantage of this if you have an inside advantage and ask them to save the bottoms for you .

Here is some green onions and a the remains of a discarded celery stalk. 
Here are scallion bottoms presoaking in Willow Water 

Here a 1/16 of an inch has been removed from a vegetable bottom to allow for fresh root growth 


Here is a pot planted with lettuce and celery bottoms 

These are Romaine lettuce bottoms that we are replanting into the soil. 

Same field a few weeks later . 


A celery bottom showing new growth . 

We at Gateway Garlic use a lot of Willow water ( see our blog Willow Water ) and because of it's rooting effects will use it here in this type of project. Whatever you use you should water your replanted starts well and never let them dry out. 
Carrot bottoms can be replanted as well. You won't grow a new carrot but what you will grow is a healthy plant that will produce seeds. This is a perfect project for those heirloom carrots you buy your farmers market. If you thought they were delicious you can now grow your own seed to plant them yourselves. Resist using most store bought carrots as they have a tendency to be hybrids but sometimes you can grow a decent carrot from the seed that was harvested off the hybrid cut carrot bottom. 
Bulbs onions are like carrots as you won't re grow the same vegetable but what you can grow are seeds. Simply put the cut top on the cut bottom ( minus the bulb in the middle ) and replant. Water well and you will see the green part regrow itself. Weeks later a seed head will develop and you'll have free seed for replanting or you can harvest the early greens for scallions. Some old world farmers will harvest their onions and replant all the tops/bottoms in the field . About six to nine weeks later they will harvest the large stalk that regrows ( before it flowers ). This is called an onion topper and some will throw this right on the grill. Blackened by fire , it is removed and the outer skin peeled away to reveal a delicious monster scallion ! 

Carrot - replanted for seed
Cabbage - replanted for same 
Bok Choy - replanted for same
Green onions - replanted for same 
Bulb onion - seed or same 
Lettuce - seed or same 
Celery  - seed or same 
Broccoli - for same 
Pineapple ( two years ) for same 

Most cut veggies work great indoors when planted in SIP ( self watering planters ) during the wintertime. A 2 liter pop bottle can be turned into a fantastic self watering window container. Remember that unless your using artificial lights ,south facing locations work best . 

There are many more that you can grow but these are just a few that we have done ourselves. Many people add avocado, garlic ( and others ) to this list but we haven't . The reason being is that they are actually the seed from which you grow these from and didn't qualify as regrow cut veggies. 
Both potato and sweet potato can be used to grow starter plants. With the potato all one has to do is to allow the buds to pop that are on the potato. Some people place these in a dark room so that the buds grow . Some people will put the potatoes in partial light to allow the buds to grow. Called chitting ,  some folks believe you grow stronger potato plants this way. Anyway you do it just simply cut your potato up into large chunks after your buds have appeared making sure you have at least one bud per chunk and plant accordingly 
A potato showing the budding 
A cut chunk of potato showing at least one bud per potato chunk 

Sweet potatoes are different creature as they will produce small plants called slips ( clones ) . When these are 4 to 5 inches long you can simply snap them off the sweet potato carefully and place in water to root. Once a good rooting system has developed you can go ahead and plant your sweet potato slips or plants accordingly. 
A sweet potato packed with slips that are being broken off for us to root .
Sweet potato slips in a jar of water which is encouraging roots the form . 
Planted sweet potato starts indoors as we wait for warmer temperatures so we can plant them outside
Here Garden member Handy Dan has shown one of the techniques we use in planting sweet potatoes is in coffee bean sacks . Part of the no till method it makes for easy harvesting.